# install.packages("remotes")
remotes::install_github("gadenbuie/xaringanExtra")Showcase your presentations in style with great-looking social media cards and responsive, seamlessly embedded slides in web pages.
You put a lot of time and effort into your slides: structuring content, choosing the right gifs, tweaking colors and picking fonts. In short: slidecrafting.

In this post, I’ll share some tips and strategies for publishing your xaringan slides online. Use the linked checklist below to get started or for review when prepping your next presentation.
This post covers some new features just released in my package xaringanExtra. If you haven’t used it before, it provides a playground of enhancements for xaringan. It’s not available on CRAN, so you’ll need to install it from GitHub:
Checklist
Fill in metadata with metathis jump to section
Create a social media card jump to section
Add a “share bar” with
use_share_again()from xaringanExtra jump to sectionGet your slides online jump to section
Pre-flight checks jump to section
Embed your slides with
embed_xaringan()from xaringanExtra jump to sectionShare with the world! jump to section
Fill in Metadata
The first step is to give your slides all the metadata required to be found via search engines or to look great when shared on social media sites.
To do this, I recommend using a small package I wrote called metathis. It’s available on CRAN!
install.packages("metathis")Basically, metathis helps fill out <meta> tags in your HTML document. These tags are used by search engines and social media sites like Twitter and Facebook to describe your page, list the title and author, link to your profile, and show a preview image for the page (we’ll get to this in the next section).
Here’s a template you can use for your own slides. I’m using a recent presentation as an example, or you can reference the example in the metathis documentation.
```{r metathis, echo=FALSE}
library(metathis)
meta() %>%
  meta_name("github-repo" = "gadenbuie/build-your-own-universe") %>%
  meta_social(
    title = "Build your own universe",
    description = paste(
      "Scale high-quality research data provisioning with R packages.",
      "Presented at R/Medicine 2020."
    ),
    url = "https://build-your-own-universe.netlify.app",
    image = "https://build-your-own-universe.netlify.app/social-card.png",
    image_alt = paste(
      "Title slide of Build your own universe:",
      "Scale high-quality research data provisioning with R packages,",
      "presented at R/Medicine 2020 by Travis Gerke and Garrick Aden-Buie"
    ),
    og_type = "website",
    og_author = "Travis Gerke",
    twitter_card_type = "summary_large_image",
    twitter_creator = "@grrrck",
    twitter_site = "@travisgerke"
  )
```
Most of the arguments are self-explanatory or well-described in ?meta_social. One thing to watch out for is that the image argument must be the full-qualified URL to the image. In other words, the entire URL including the https:// bit, taking into account where the slides will live when you put them online.
Create a Social Media Card
Why should you add a preview image?
Social media cards are the rich link previews you see on websites like Twitter and Facebook. I think it’s worth the extra work to include a preview image for several reasons.
First, it’s much more likely that your link will be seen, especially if your preview image is interesting or visually compelling. Users are more likely to click through and take a look at your slides when they have some idea of what’s on the other side of the link.
Second, the preview image is a tiny window into your own personal style. You have no control over the rest of the time line where your link is being shared — your 280 characters look just like everyone else’s — but your preview image is your space to visually communicate your personal style.
And finally, using a preview image means that your crafted message will appear every time your link is shared, not just the first time. A common alternative is to share the link to the slides, but to add an image to share post. This looks great the first time the link is shared, but when someone else shares your slides’ link, they probably won’t go to the trouble of including a screenshot.
Here are three examples of tweets sharing slides that illustrate the various approaches to link previews.
 {.lightbox description=“Slide link with limited metadata. (
 {.lightbox description=“Slide link with a shared image. (
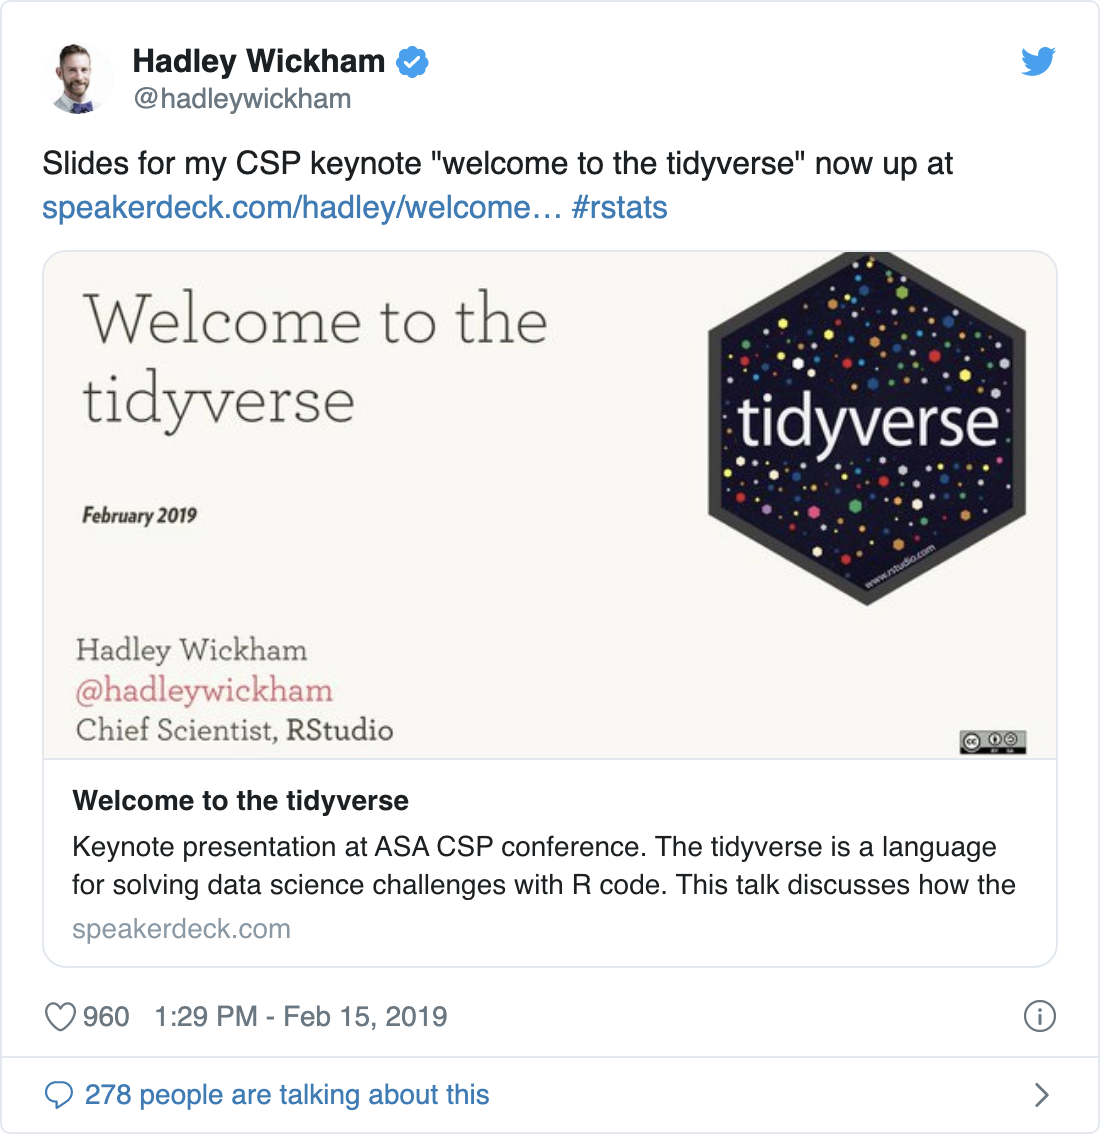 {.lightbox description=“Slide link with a preview image and complete metadata. (
Taking a screenshot of your slides
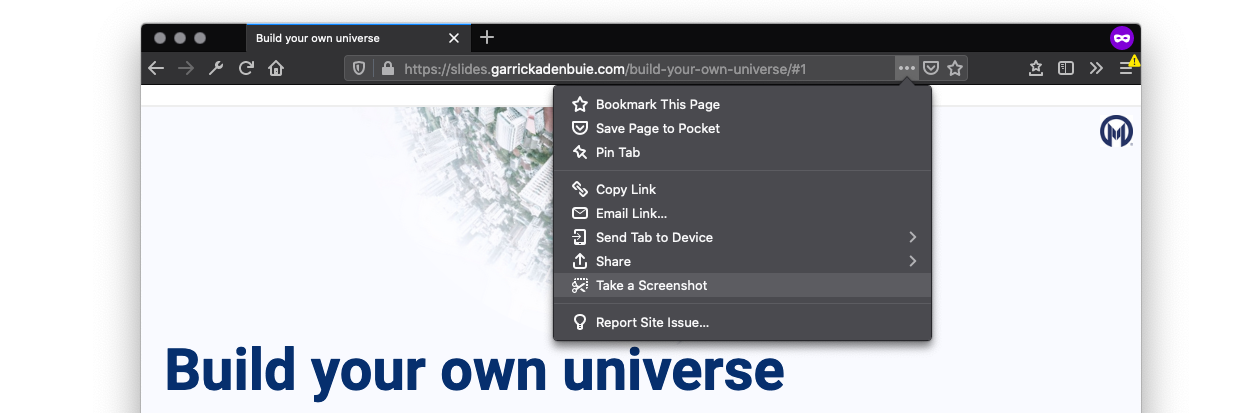
How do you create an image for your social media cards? I’m glad you asked! Typically, I like to take a screenshot of the title slide and use that as the preview image.
Taking a screenshot of your slides is incredibly easy if you’re using Firefox, which has a built-in screenshot feature. On Chrome, you can install an extension, like Nimbus Capture.
To take a screenshot, I open my slides in Firefox and select Take a Screenshot from the three-dots menu in the browser URL bar.
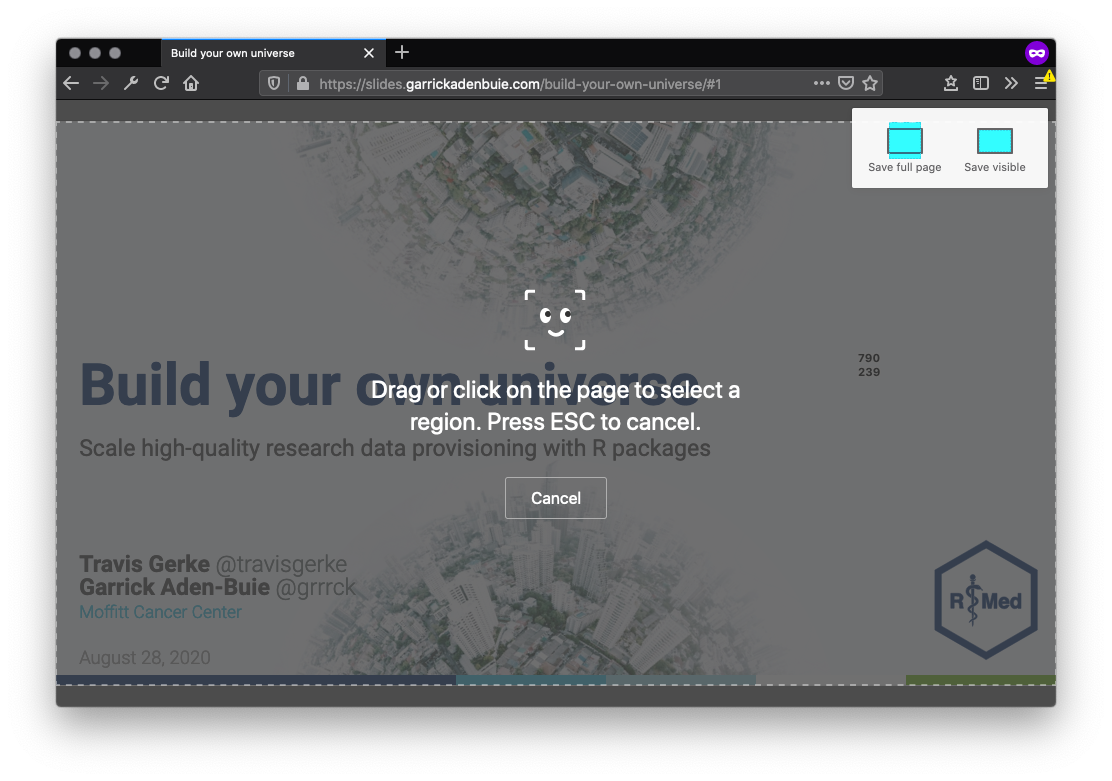
Then, don’t click “Save full page” or “Save visible”. Instead, click on your slides area so the entire slide is selected and then click “Download”.

Get Your Slides Online
Now that your slides are all set up and ready to be shared (or presented!), you need to get your slides online! For tips on how to best get your slides online, I’ll defer to the excellent presentation, Sharing on Short Notice, by Alison Hill and Desirée De Leon.

Sharing on Short Notice by Alison Hill and Desirée De Leon
Those slides are also available at the short link rstd.io/sharing.
Pre-Flight Checks
Now that your slides are online, it’s time to check that they look as good as you expect before you share them with the world.
To check your metadata, you can use Twitter’s share card validator. Drop in your link and Twitter will show you a preview of the share card for your link. Much better than sending yourself private messages to find out how your share card looks!
Similarly, you can also test your Open Graph tags (used by Facebook and other sites) with opengraphcheck.com or on Facebook’s Sharing Debugger.
Finally, it’s a good idea to open your slides in every browser you have on your machine — or at the very least in just one browser — and walk through your slides to make sure everything works and that you haven’t forgotten to upload any images or assets.
Embed Your Slides
Now that your slides are out in the world, you might want to embed them in your web page, for example in a talk page or the talks section of your website.
To do this, I recommend using embed_xaringan() from xaringanExtra. It embeds your slides in a responsive, aspect-ratio <iframe>, meaning that the slides are seamlessly embedded in the page and their size is automatically adjusted to maintain the aspect ratio that matches your slides.
Here’s an example of embedded slides from a recent talk I gave with Travis Gerke.
xaringanExtra::embed_xaringan(
url = "https://build-your-own-universe.netlify.app",
ratio = "16:9"
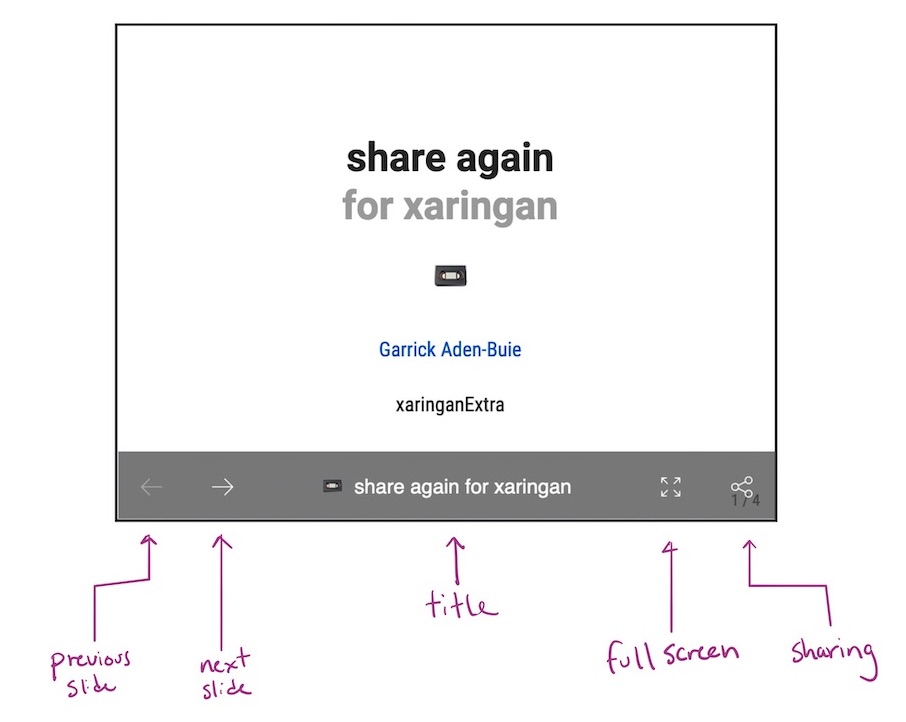
)Notice that if you’ve used share again, your embedded slides will have a nice share bar for navigation and sharing.