rstudio::conf(2022) runs on R
rstudio::conf(2022) is just around the corner! This year, I’ve been fortunate to be part of the conference program committee, the small group of RStudio people who gather and evaluate talk submissions, make the tough scheduling decisions about the sessions and talks in the conference program, and generally wrangle and herd all the speaker and talk information into the final schedule.
My favorite part of the process — apart from seeing all of the wonderful and creative ways our community approaches data science with R (okay, and Python too) — is finding out how many creative ways we use R to manage the conference. Let’s just say Jenny Bryan is a literal Google Forms/Sheets/Drive wizard.
One of the things I love about R is the cycle of starting a task wondering Can I do this with R? and ending with Wow, I can do this with R! I’ve been using R for a while and I’m still occasionally surprised when I find myself on this virtuous loop.
This post is about an otherwise mundane conference admin task that would have involved a lot of manual labor (in the form of clicks and mouse movements) that I automated with the help of a few R packages. Maybe in future posts I’ll share more cool things that we did with R in the making of rstudio::conf.
Oh and I hope to see you there, either in person, online or on Twitter at #RStudioConf2022! Learn more at rstd.io/conf.
Send me your profile picture, please
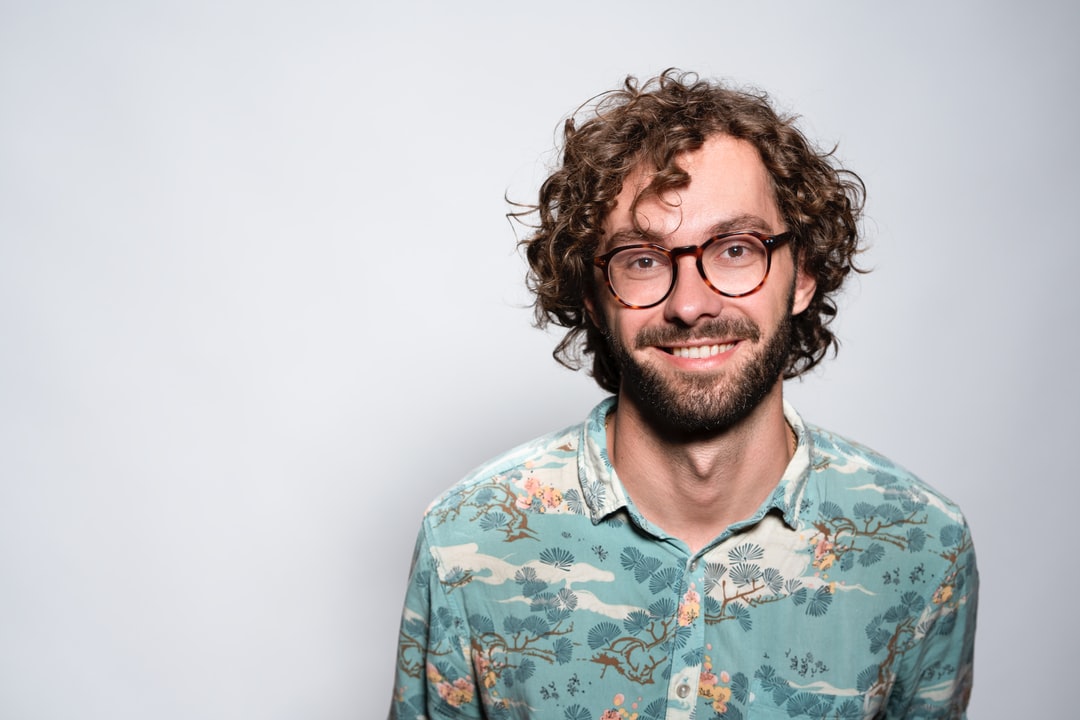
Suppose you’ve asked 100-ish people to send you a profile picture and to your surprise they all followed through and sent you an actual image.
But, of course, you now have a new problem. Each of those 100-ish people has used slightly different sizes for their profile picture. They’re all sorts of different shapes, sizes, and resolutions.
Some people’s profile images feature their faces, centered and tightly cropped. Others are photographed at a distance or off-center.
In their final placement, you want all of the profile images to be circular images centered on the person’s face as much as possible. If we took the image above and simply centered it inside a circle, we would get something like this:
The example profile image clipped to fit a circular avatar image. The subject appears at the right edge of the circle. About 40% of their face is clipped.
Obviously, we’d rather not clip half of the person out of their profile image, so we’ll need to edit this photo. But there are hundreds of them and most of them will need some adjustment.
Good news! You have access to R, where we can use tools like magick to read and process the images, or face detection with neural networks. So with a few hours of work you can save yourself an hour of mindless clicking. Let’s do this!
Collect the Profile Pictures
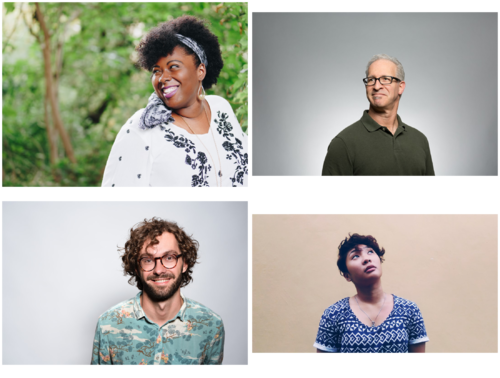
To see how this all works, I’ve downloaded four example profile pictures from unsplash1.
dir.create("profiles")
photo_ids <- c("DItYlc26zVI", "bpxgyD4YYt4", "6anudmpILw4", "3dqSZidOkvs")

for (id in photo_ids) {
  download.file(
    sprintf("https://source.unsplash.com/%s", id),
    sprintf("profiles/%s.jpg", id)
  )
}
I’ve put the photos in a profiles/ directory so that I can list the them all at once:
fs::dir_ls("profiles")
## profiles/3dqSZidOkvs.jpg profiles/6anudmpILw4.jpg profiles/DItYlc26zVI.jpg
## profiles/bpxgyD4YYt4.jpg
Magick with R
The first step is to use the magick package to read in our profile pictures.
library(magick)
library(purrr)

profiles <-
  fs::dir_ls("profiles") |>
  map(image_read)

profiles
## $`profiles/3dqSZidOkvs.jpg`
##   format width height colorspace matte filesize density
## 1   JPEG  1080    810       sRGB FALSE   135368   72x72
##
## $`profiles/6anudmpILw4.jpg`
##   format width height colorspace matte filesize density
## 1   JPEG  1080    720       sRGB FALSE    46181   72x72
##
## $`profiles/DItYlc26zVI.jpg`
##   format width height colorspace matte filesize density
## 1   JPEG  1080    720       sRGB FALSE    87827   72x72
##
## $`profiles/bpxgyD4YYt4.jpg`
##   format width height colorspace matte filesize density
## 1   JPEG  1080    608       sRGB FALSE    80277   72x72
Here are the four profiles. As you can see, they come in a variety of sizes and the person in the frame is rarely centered.
Finding Faces
Now for the most fun of this entire post. After a quick search on r-pkg.org, I found a few packages that provide methods for facial detection; I tried image.libfacedetection first and it worked out so well that I didn’t have to look any further on the list.
As it says on the CRAN page, image.libfacedetection is
An open source library for face detection in images. Provides a pretrained convolutional neural network based on https://github.com/ShiqiYu/libfacedetection which can be used to detect faces which have size greater than 10x10 pixels.
The best feature — apart from reliably detecting faces — is that it works really well with magick. The core functionality is all wrapped up in a single function, image.libfacedetection::image_detect_faces(), and the example in the README tells you just about everything you need to know.
In short, after reading the image into R with magick::image_read(), you can call image_detect_faces() to find faces in the image. image_detect_faces() returns data about the detected faces, and you can use its plot() method to overlay boxes over the found faces in the image.
library(image.libfacedetection)
faces <- all_profiles |> image_detect_faces()
plot(faces, all_profiles, only_box = TRUE)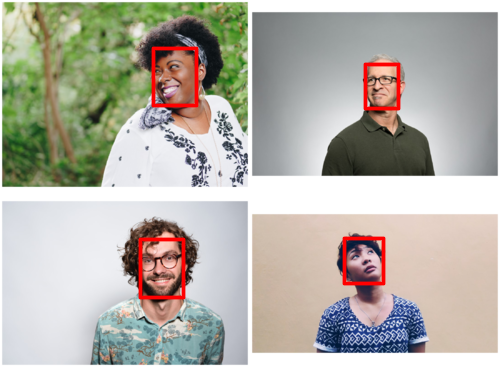
image_detect_faces() returns some interesting data about the detected faces:
The data frame detections indicates the locations of these. This data.frame has columns
x,y,widthandheightas well as a column calledconfidence. The values ofxandyare the top left of the start of the box.
faces
## $nr
## [1] 4
##
## $detections
##     x   y width height confidence landmark1_x landmark1_y landmark2_x
## 1 153  48    43     57         99         158          70         175
## 2 140 239    43     58         99         150         260         171
## 3 365  64    33     44         99         373          79         387
##   landmark2_y landmark3_x landmark3_y landmark4_x landmark4_y landmark5_x
## 1          68         162          80         162          92         177
## 2         260         160         272         151         282         168
## 3          80         377          86         372          94         385
##   landmark5_y
## 1          89
## 2         282
## 3          95
##  [ reached 'max' / getOption("max.print") -- omitted 1 rows ]
##
## attr(,"class")
## [1] "libfacedetection"
Since we asked for a profile picture, we can reasonably expect that there’s only one person in the image. So we’ll take the detection with the highest confidence (in case something else registers as a face), and find the center of the detected region.
find_face_center <- function(image) {
  detections <- image.libfacedetection::image_detect_faces(image)$detections
  best_face <- which(detections$confidence == max(detections$confidence))
  dims <- as.list(detections[best_face[[1]], ])
  list(
    x = dims$x + dims$width / 2,
    y = dims$y + dims$height / 2
  )
}
So when applied to our example profile image, we find that our subject’s face is centered at (697.5, 290).
face_center <- find_face_center(profiles[[3]])
str(face_center)
## List of 2
##  $ x: num 698
##  $ y: num 290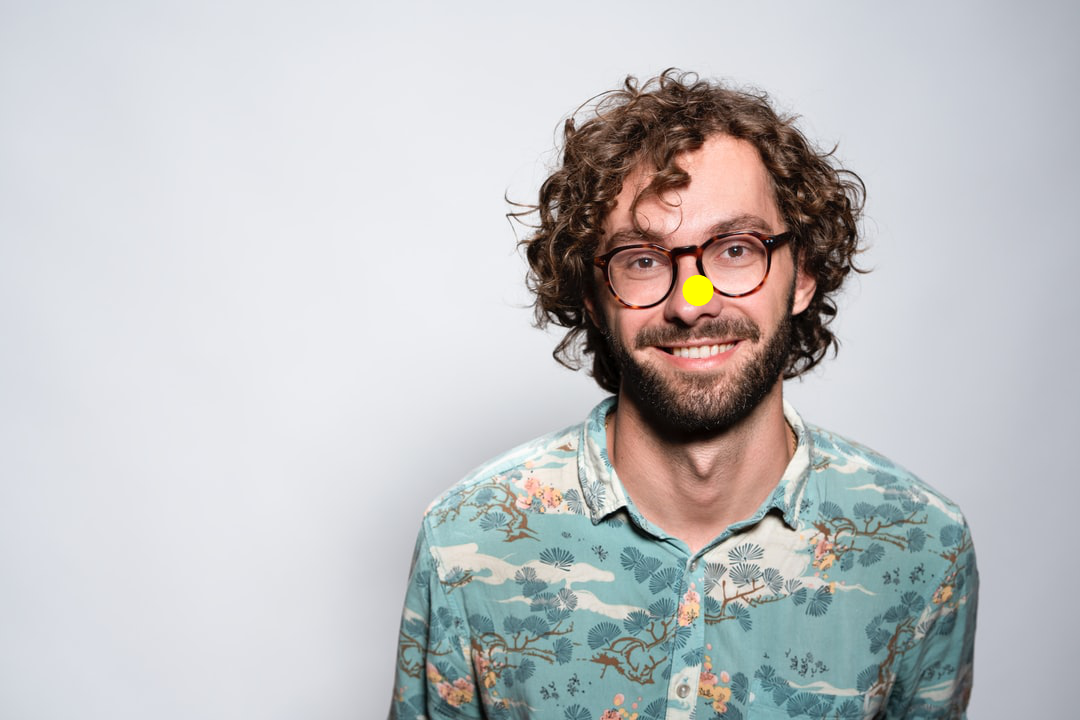
In the next steps, we’ll resize and crop the photo so that it’s centered, as much as possible, on this point.
Resize
Our goal is to resize and crop the photo into an 600px square image. If we start with an image smaller than 600px in either dimension, then we won’t scale up. We also take another shortcut: since most people will provide a profile image that prominently features their face, we can start by shrinking the smaller side of the image down to match the desired image size.
This shortcut keeps us from perfectly framing the person’s face. Sometimes their face is too close to the edge of the picture, and in other cases there may be negative space around their head that will end up in the cropped profile image. I’d argue that this is okay. It keeps our cropping from being too perfect and the final images still retain some of the character of the original photo.
Our example profile image is 1080px wide and 720px tall, so we’ll resize the image proportionally down to an image with height 600px.
resize_fit <- function(image, size = 600) {
  info <- image_info(image)
  size <- min(size, info$width, info$height)
  image_resize(
    image,
    geometry_size_pixels(
      height = if (info$width >= info$height) size,
      width = if (info$height > info$width) size
    )
  )
}
When applied to our example profile image, we end up with a 900px × 600px image.
resized_profile <-
  profiles[[3]] |>
  resize_fit()

resized_profile |> image_info()
##   format width height colorspace matte filesize density
## 1   JPEG   900    600       sRGB FALSE        0   72x72
In the next step, we’ll figure out which 600px horizontal region best covers the person’s face.
Find Resized Faces
Wait. I showed the face-center discovery step above because it’s the coolest part of this pipeline, but we don’t actually perform the facial detection first. We need to know where the person’s face is located after we scale down their profile image.
resized_profile |>
  find_face_center()
## $x
## [1] 579
##
## $y
## [1] 240.5
Cropping
Now that we know where the center point of the person’s face is located in the image, and also because we’ve already resized the image so we don’t have to worry about its height, we only need to crop the image in one direction. The problem now is that we need to pick a 600px width region within the full 900px range.
           point
|------[=====*=====]---|
       ^~~ width ~~^
^......................^ range
This isn’t too complicated. There are three cases:
- The
pointis so close to the start of therangethat it we can’t center the point in ourwidthand instead have to start at 0. - Similarly, the
pointmight be so close to the end of therangethat our cropwidthlines up with the end. Or, in other words, the crop width starts atrange - width. - Or finally, we can center the
pointin our cropwidth, so it should start atpoint - width/2. - Oh, and there’s an edge case: if the
widthis greater than or equal to the fullrange, then the offset is 0, too.
This logic gives us the following crop_offset() function:
crop_offset <- function(point, range, width) {
  # 4. Catch the edge case first
  if (width >= range) return(0)

  if ((point - width / 2) < 0) {
    # 1. must start at left edge
    return(0)
  }
  if ((point + width / 2) > range) {
    # 2. must start at right edge
    return(range - width)
  }
  # 3. enough space on both sides to center width in range
  point - width / 2
}
Which in our example case tells us that we could crop our resized profile image to a 600px square, offset by the following amount in the x direction:
offset <- crop_offset(
  point = 579,
  range = 900,
  width = 600
)
offset
## [1] 279
We can use magick::image_crop() with the magick::geometry_area() helper function:

When this image is used as a profile or avatar picture, it ends up looking much better than the uncropped and uncentered version!
The example profile image cropped and centered to fit a circular avatar image. The subject appears directly in the middle of the circle.
Put it all together
The last step is to put everything we’ve sketched out above into a single function that takes a magick image and returns a new cropped and centered version. And here’s that function.
resize_crop_to_face <- function(image, size = 600) {
  image <- resize_fit(image, size)
  info <- image_info(image)

  # size may have changed after refit
  size <- min(info$height, info$width)

  is_image_square <- info$width == info$height
  if (is_image_square) {
    return(image)
  }

  face <- find_face_center(image)

  image_crop(
    image,
    geometry = geometry_area(
      width = size,
      height = size,
      x_off = crop_offset(face$x, info$width, size),
      y_off = crop_offset(face$y, info$height, size)
    )
  )
}
Starting over from the beginning, we can read all of the profile images and resize and crop them around the subject’s face in just a few lines
profiles <-
  fs::dir_ls("profiles") |>
  map(image_read) |>
  map(resize_crop_to_face)
and then we can write them back into the profiles directory.
fs::dir_create("profiles_cropped")

profiles |>
  iwalk(function(image, path) {
    new_path <- fs::path("profiles_cropped", fs::path_file(path))
    image_write(image, new_path)
  })
The end result is four perfect profile pictures!
A young black woman, centered in the image, against a green background.
An older white man on a gray background, centered in the image.
The example profile: a young white male centered in the image.
A young woman against a tan background, centered in the image.
Footnotes
Images by christian buehner, Eunice Lituañas, Foto Sushi, and Eye for Ebony.↩︎